project2016 / Raised Bed Gardening
April 18, 2016
Why am I doing this?

Recently, it has come to our attention that Alex and I need to lose some weight. Well, mostly it was Alex's doctor who suggested it for her, but in the spirit of solidarity, I have been joining her on this journey. We were both getting pretty chunky. To combat the weight, the main thing that Alex has been consuming a lot more of lately is produce. While it's not exactly expensive to buy produce from the store, it's a fun and interesting project to try and grow our own vegetables in our back yard. It's one more skill we need to get a good handle on before our eventual planned move to Utah. The yard is not huge, but it does get quite a bit of sunlight in the summer time. In the past, we have attempted to grow things like tomatoes, and failed. We've also been able to successfully grow sunflowers, radishes and zucchini squash.
Along the back fence of our yard, we have a slightly raised section that contains a few small trees and a rose bush. In the past we have grown things up there, but lately the neighborhood cats (including our own) have decided it's a convenient place to evacuate their bowels. It's pretty gross, and carnivore feces is not usually the best for composting, especially cats that may have and spread toxoplasmosis through their poop. I've tried things like spreading landscaping fabric and covering with black wood mulch, but it only hindered the cats for a short period of time. They eventually took to just going on top of the fabric and attempting to cover it with mulch. Because of this, I decided a raised bed with some kind of protection from the local fauna would be the best solution.
Our yard is not huge, only about 180 square feet. It is also on the north side of our two-story condo, so it does not all receive sunlight. We have a concrete patio that takes up about half the space in the yard, which leaves about 90 square feet to grow things. California is going through a major drought, and southern California is baring the brunt of it. Due to the water restrictions, I decided it wasn't worth keeping my grass alive anymore. That freed up a bunch of space in the middle of the yard, and so the idea to build a raised bed was born.
The Plan & "Design"

I was mostly just winging it with this project, but I did have an overall idea in my head on how it should be built. I wanted to use as much space as possible to plant our garden, while still allowing the ability to walk all the way around to have full access to the bed. Based on the fences, air conditioner compressor, and various other landscaping I didn't want to attempt to move or remove, I had about 9ft by 4ft of working space in the middle of the yard. I thought 4ft would be a bit of a stretch for Alex and I to reach across, so 3ft wide was the decided width, while the full 9 feet of length was used. I wanted to make the bed high enough that it would not require significant amount of hunching over to tend the crops and pull any errant weeds, so I decided on a 2ft high bed. I also wanted it to be very sturdy, and to practice my recently YouTube-acquired pole barn building skills, so a 4x4 post would be buried 1ft below grade and extend to to the top of the bed. Originally I thought having some chicken wire draped over the bed in an arc would be sufficient to keep the cats out and allow the plants to grow. Eventually I decided to change up the plan slightly so that there was a full cage over the bed to provide much better protection. The final design will also potentially allow us to convert it to a greenhouse with some clear plastic sheeting for early and late winter growing (not much sunlight hits the yard in the middle of winter). I also wanted to attempt to build my own drip irrigation system using excess PVC fittings purchased during my PWC Rack build.
The Initial Build
I'll start out by saying I didn't think to take pictures during my build, only afterwards. This isn't rocket surgery though, it's almost like banging rocks together.I started by visiting my local big box store to purchase lumber, poultry netting, and an extra piece of 3/4" PVC pipe. I figured that if I was going to build at 9ft by 3ft, I could buy some 2x12 boards in 12 foot length, cut them at 9ft and use the remaining 3ft for the end pieces. After pricing out the wood, I decided to keep the project under a completely arbitrary, spur-of-the-moment budget, and went with only a lower course of 2x12 and an upper of 2x8. Stacking the boards in my intended fashion makes the bed's top edge at a height of 20" from the ground, which turns out is not so bad for bending over. After measuring the board when I got home, I found that a 12ft board is not actually 12ft, it was more like 12ft 3in in length. Because I had 4ft of room to play with for the width of the bed, I just used the full length of boards, cutting at 9ft, making them 39" wide (outside dimensions). I will pretend that I planned it that way so that the interior width is almost exactly 3ft.

After doing a terrible job of cutting the lumber to the decided length, I assembled it all together in two boxes, with the top box having longer end rails so that when the boxes were stacked, the seams at the corners did not line up, similar to brick laying. After having the box dimension finalized and laid out in the yard, I dug a post hole at each of the four corners. That took some work going through the mesh that was embedded in the sod I had planted a couple of years ago. Once I had all four posts plumbed and stabilized, I screwed both boxes to the posts. They were now very sturdy and didn't move around much. I went back and forth on deciding if there should be center posts, but after some quick experiments trying to bow the boards out in the center, I chose not to. The two-by material is plenty strong enough to handle any pressure exerted outwards by the 1.5ft of soil I am going to put in the bed. That left me with a roughly 5ft section of 4x4 that I didn't know what to do with. Then it occurred to me that I might plant climbing plants that would want a vertical post to climb. So I dug another post hole in the middle of the bed, towards one end and stood the post vertically there. It sticks up to just below eye-level when standing outside of the bed, and I will, in the future, attach horizontal runners that will allow climbing plants to grab hold and support them.
Once the box was completed, it was time to prepare it for growing our first crops. On a Friday afternoon for my lunch break, I headed over to OF Wolfinbarger to get a load of soil to fill the bed. I chose their "special mix" which is 50% topsoil, 50% planter, at the suggestion of the lady at the front desk. After the soil settles over this growing season, I will most likely get one scoop of the veggie mix to lay over the top of what's in there now to fortify the soil with some more nutrients.


Planting
After filling, we started sowing seeds into the dirt. Since I'm not a big fan of eating vegetables, I let Alex decide on what to plant. We saved some seeds from a spaghetti squash and planted those along with some purchased zucchini squash seeds at the west end of the planter separated by about 2ft. I figured that the squashes would be content with growing next to each other, and the leaves of each plant would help each other shade the fruits and keep moisture under them a little better. I also thought it'd be best on this end as my fence will block some of the late afternoon sun coming in from the west, hopefully keeping the squash healthy.About three feet down the bed, we planted a single row of carrots. The plan is to grow one row at a time, and as each row gets about halfway through its growth period, we'll plant another row, hopefully leaving us with a steady supply of carrots for a few summer months. Another three feet down we planted a row of French breakfast radishes. These are a different variety from last time, but we had good success in our yard with them before, so we figured why not. Finally, about a foot in from the eastern end of the bed we planted some red bell peppers. I forget the exact variety, but bell peppers are Alex's favorite veggie, and we're hoping for a great abundance of them for her to eat.

Protection and Irrigation
 Bell Peppers... eventually.
After getting the seeds planted in the ground, I thought about how I was going to protect the planter from being dug in by the cats for pooping purposes. At first I thought I should just lay the chicken wire straight across the soil and let the seedlings grow up through the mesh. After thinking about it for a bit, it probably would have worked fine for the above ground plants, but for the carrots and radishes, which are roots that need to be pulled up when harvesting, it would have been difficult at best. I decided I would cut about four or five foot lengths of chicken wire and use the natural curve that it exhibits when removed from the spool to build a "dome" over the planter. I didn't have a staple gun at this point, so I used finishing nails to hold the mesh in place. After only one good finger-smashing incident, I had the entire bed covered by the mesh. It worked well to protect the plants.
About 20 minutes after getting everything covered with the mesh, I realized I forgot the irrigation. I could just water the plants with the hose, like I do the rest of the stuff around my property, but I wanted to experiment with low cost "drip" irrigation. So, working with the PVC I had on hand, I came up with an "E" shaped design that would have holes drilled in the pipe at regular intervals to distribute the water. I could have probably spent $15 at Home Depot or Lowe's and bought a drip irrigation system that would meet my needs, but I have a terrible case of NIH disease. After finagling the system in through the chicken wire instead of doing it properly, I had it all set up and ready for growing. From there, other than watering the plants every other day or so when it didn't rain or when the soil got dry, I mostly left it alone; but the half-assed chicken wire protection scheme was eating at me from the inside. I had to make it better.


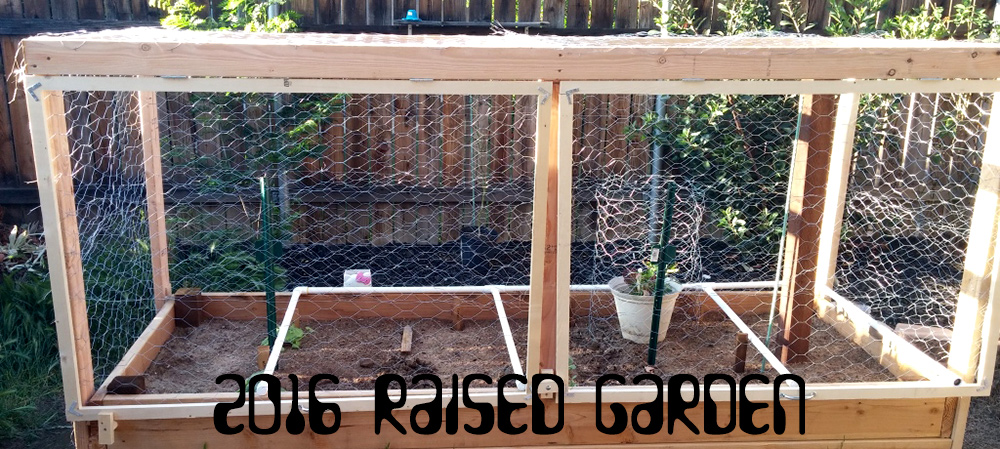
Building a better cage
Finally, a few weeks after the initial design and build, I decided that it needed to be better. It looked like crap, and once the squash grew much larger, it would run out headroom and the plants would have to start sprawling across the bed. I still haven't come up with a solution to the sprawling problem, but I will experiment with a few things to see if I can get the squash to grow UP instead of out.After thinking about it a bit more. I decided that a cage about 5ft high would be sufficient for everything we'd expect to grow in this bed. I went for some more lumber, and came up with a plan that included two giant swinging doors on the front of the cage to make it easy to get to everything in the bed. At first I thought about building doors on both sides, but I figured we can just reach a little further from the front to access stuff towards the back of the bed. Using 2x4s, I built up some vertical posts on the outside of the bed at either end, and ran a 9ft board across the top in both the front and back. I attached the front doors to the frame with some $2 hinges and covered everything in the same poultry netting I used before. I built some simple latching mechanisms to hold the doors shut when not accessing the garden, and to keep jerk animals from sneaking in for some fresh produce. I'm looking at you, opossums and raccoons. With hindsight being 20/20, I think I should have probably made the doors open horizontally, instead of vertically. As they are now, you have to use a bungee cord to hold them open when working in the garden. They're functional, but slightly annoying to work with. This may be something I change in the future, it shouldn't be difficult to just move where the hinges are mounted to the side instead of the top.
Now that everything is completed, I am much happier with the results, and I think this is going to end up being a great place to grow veggies, safe from the grubby little paws and poops of the local fauna. I will add updates to this post as the growing season progresses.


